Web Development
Designing a Calculator with HTML, CSS, JavaScript
Ipshita Soni

We have all seen shopkeepers using manual and classic calculators for billing purposes. But here is an easy web development project to make such a calculator but web-based. It is much more helpful if the calculator is web-based because all the manual errors get emitted. This small guide to building a calculator with HTML, CSS, and JS is super easy and is best suitable for beginners.
Read more..
 Looking to build projects on Web Development?:
Web Development Kit will be shipped to you and you can learn and build using tutorials. You can start for free today!
Knowledge required: Basic concepts of HTML, CSS, and JS.
Tools required: Visual studio code.
- Make a new folder for the project. Then, open the Visual Studio code IDE and get started.
- Create a new file in your folder with HTML extension. This file will contain all the drivers of our project.
- You will design the calculator with HTML and CSS and add logic to it with JavaScript. Therefore, you will have to make two more files in the same folder with CSS and JS extensions too.
- You can use the emmet feature which is already built in the Visual studio. It is a great feature to all web developers as it will build the HTML boilerplate in one click.
- Give a title to your page. Now, use a live server to see if it works or not. Go to extensions and then live server, if it is not installed already then install it. Once you click on go-live then your HTML file will open.
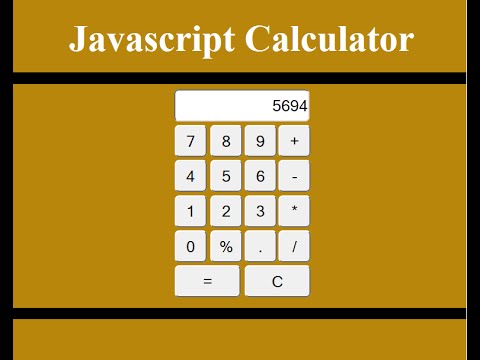
- The calculator will have a screen that displays the change and operations every time a button is clicked. The calculator will have buttons as desired like numeric, operators and a clear screen button. You will also have to add functionality to these buttons. If you want you can refer to the image given to decide what buttons to add.
Latest projects on Web Development
Want to develop practical skills on Web Development? Checkout our latest projects and start learning for free
Example: If the buttons 2, +,3, and = are clicked the output screen should display 2+3=5.
- Link the JS and CSS files in your HTML code. Make a class and give a heading to your calculator in it. Insert the output screen which will display all the operations done. You will also make an HTML table that will carry all the buttons of the calculator. Make a table tag in HTML and insert buttons into it in a row or in a column.
- Now comes the CSS play. You can style and play with the calculator’s design as you want. Align the text properly and do not forget to centre the calculator. Increase or decrease the font size accordingly. You can also style all the buttons by adding a background color to them and changing the font’s color too. Also, alter the width and height of the buttons.
- The next step is to add functionality to the calculator. You will add logic to it by JS. Therefore, open the file and add the logic such that each time a button is clicked its text is extracted.
- Add all the operations in the JS file with the help of if statements. Do not forget to add functionality to the clear screen button.
 Did you know
Skyfi Labs helps students learn practical skills by building real-world projects.
You can enrol with friends and receive kits at your doorstep
You can learn from experts, build working projects, showcase skills to the world and grab the best jobs.
Get started today!
Kit required to develop Designing a Calculator with HTML, CSS, JavaScript:
Technologies you will learn by working on Designing a Calculator with HTML, CSS, JavaScript:
Designing a Calculator with HTML, CSS, JavaScript
Skyfi Labs
•
Published:
2020-07-26 •
Last Updated:
2022-04-18
 Looking to build projects on Web Development?:
 Did you know